
| Version 58 (modified by , 15 years ago) ( diff ) |
|---|
Table of Contents
- What is the Scheduling GUI?
- Getting Started
-
Day to Day Use
-
Managing Appointments
- Opening or Viewing a Schedule for a Selected Resource
- Finding an Available Appointment
- Making an Appointment
- Editing Appointment Information
- Changing Appointment Times
- Deleting Appointments
- Marking a No-Show Appointment
- Undoing a No-Show Appointment
- Using the Appointment Clipboard
- Checking a Patient In
- Viewing and Printing
-
Managing Appointments
Scheduling GUI User Manual
Welcome to the Scheduling GUI User Manual. This version reflects the software as of version 1.6. The software is liberally licensed under LGPL; this manual is licensed under CC BY. These licenses enable you to use and modify the software even in commercial settings.
Note: Information on system requirements, installation, and setup has been moved to the Scheduling GUI Technical Manual.
What is the Scheduling GUI?
Clinical Scheduling for Windows (BSDX) package is the Windows Extension of the PIMS Scheduling program in VISTA. It gives you many appointment management functions included in PIMS Scheduling, but with the added convenience and usability of a Graphic User Interface (GUI). The IHS Clinical Scheduling for Windows (BSDX) package should be used with PIMS Scheduling.
Getting Started
Before you launch the Clinical Scheduling package, double-check with your supervisor or Application Coordinator that the package has been properly installed and configured on your machine. Have your login information ready (you will use the same login information you use to access RPMS or VistA).
Login
To begin, select Clinical Scheduling using the Start menu or double-click the Clinical Scheduling desktop icon. This should bring up a splash screen and login dialog box. Enter your access and verify codes in the dialog box and click "OK." You should then see a window similar to the one below.

Initial view of the Clinical Scheduling application after logging in
If you encounter problems logging in, please consult your supervisor or Application Coordinator.
Terminology
Here are some key terms used in the software, and in this documentation.
| Term | Description |
| Access Block | Color-coded blocks representing the time allotted for a specific Access Type (appointment). In the some places, they may be referred to as an Availability Blocks. |
| Access Types | Different kinds of appointments. Most clinics set up two Access Types: Scheduled and Walk-ins. In some places, Access Types may be referred to as Availability Types |
| Access Groups | Groups of Access Types. Clinics with only the two Access Types (Scheduled and Walk-ins) usually only have one Access Group containing both types. In clinics with a wider range of Access types, Access Groups make it easier to schedule and search for certain types of appointments. |
| Resources | Any person or service for which a patient can be scheduled. Resources can be physicians, diagnostic equipment (such as MRI, CT scan, ultrasound, and so on), or specialty appointment slots, such as physical therapy. Resources corresponds to what PIMS calls Clinics |
| Resource Groups | Resource Groups are categories of Resources that help to organize the variety of Resources available at each location. For example, a Resource Group of Dermatology can be used to group 3 different dermatology Resouces. In some places, Resource Groups may be called Departments. |
| Slot | Number of appointments per defined appointment length. For example: If SLOTS = 4 and your clinic (resource) appointment length is 30 minutes, then there are four (4) available appointments for every 30 minutes. |
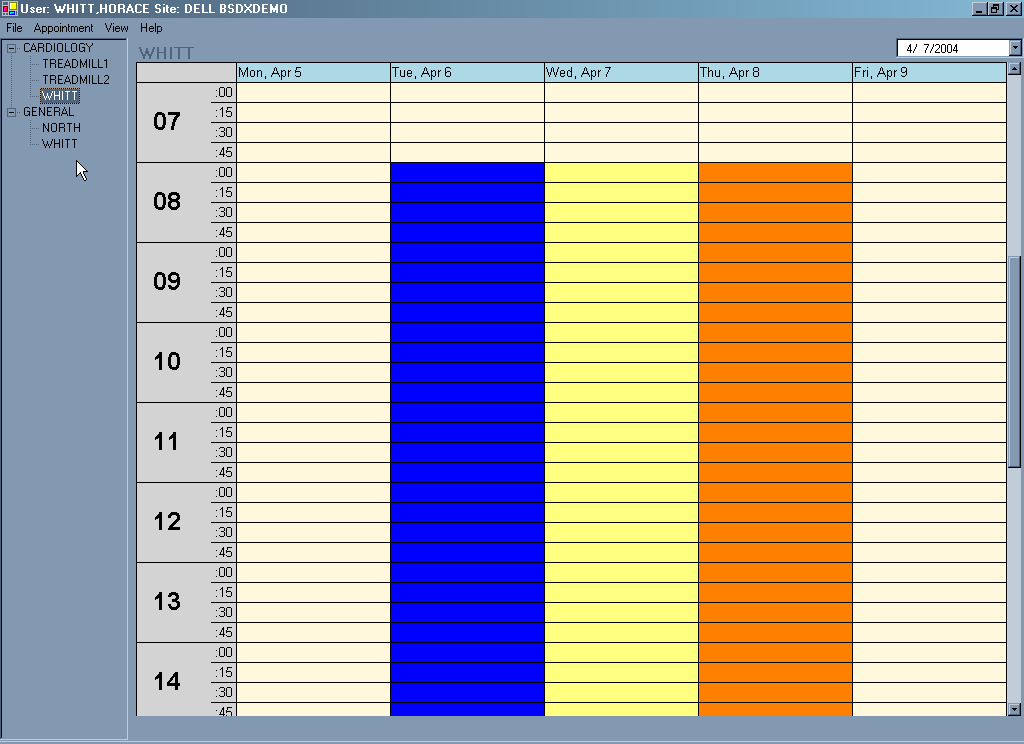
Clinic Display Area
The clinic schedule area is composed of date columns and time rows. Each column represents a day and each row represents a time interval. The time intervals can be 10, 15, 20, or 30 minutes. You can change the time interval using the View menu as long as the time interval is greater than the clinic default slot time. For more information about Time Scale, see the View Menu.
Access Blocks (areas of the schedule which are available for patient appointments) are indicated by the adjacent appointment times and dates. They may be color-coded to user preference. Different colors represent different Access Types. Position the cursor in such an area and click on the schedule display. The type of clinic access and the number of appointment slots available are visible in a message in the status bar at the bottom of the scheduling window. Clinic Access Types and colors can be defined and changed by the administrator of the scheduling package. (See Setting Up and Administering BSDX on for more information.) TODO: FIX THIS LINK.
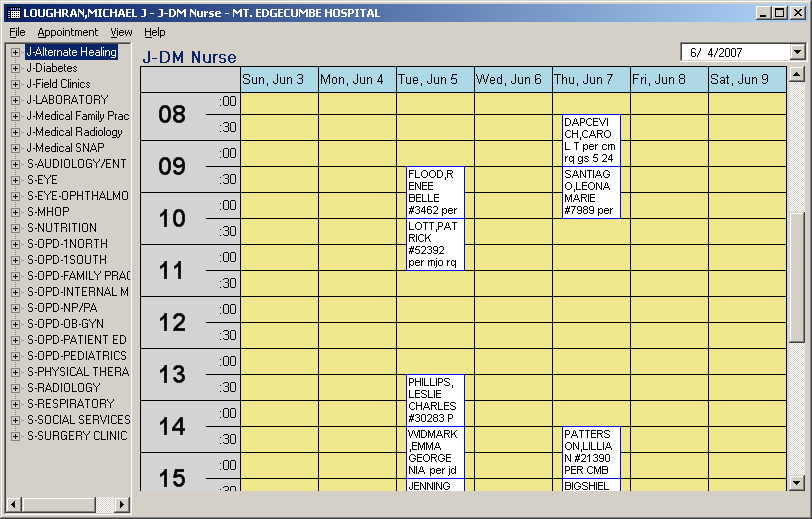
Patient appointments are displayed on the schedule as white boxes containing a patient name and a note (if applicable).

Desktop showing patient appointments and multiple clinic schedules
Basic Screen Layout
The basic 5-day appointment screen is displayed below. At the far left is a menu tree view showing the Resources organized by Resource Group. In this case, the expanded view of Cardiology group shows three Resources. A Resource can be linked to a VISTA scheduling clinic so that when a patient has an appointment at that clinic and checks in, the PIMS encounter is checked in.
The colors on the schedule display correspond to various Access Types, set up for this Resource. The Resources, Resource Groups, Access Types, and colors can be customized to your individual clinic. You can create your own Access Types, Resource Groups using the Scheduling Management window. (See Using the Scheduling Management Window on page 54 for detailed instructions.) TODO: FIXME.

Basic Screen Layout
Table 2.2 describes the various items displayed on the basic screen layout.
Table 2.2: Descriptions of screen items
| Screen Item | Description |
| Title Bar | Shows user ID and facility location in the upper left corner of the screen |
| Menu Bar | Appears below the Name and location of current user. The available text menus are: File, Appointment, View, and Help. |
| Resource Group Pane | Appears at the far left of the screen, below the menu bar. Displays the available Resources. |
| Times | Appears at the left side of the screen. Times are shown by hour and then by segment. They are listed in military time (for example 13:00 equals 1:00PM). |
| Resource Name | Appears in the upper left side of the screen, immediately above the “Times” column. Displays the name of the Resource currently active in the client window. |
| Client Window | Area on your screen that shows the work space for an application. |
| Appointment Date Selector | Appears in the upper right corner of the screen, below the Minimize, Maximize, and Exit buttons. The date selected is the starting date of the appointments currently displayed in the client window. The range of appointments displayed can be 1-day, 5-day, or 7-day. |
| Minimize, Maximize and Exit | Appears in the uppermost right corner of the screen. These buttons function just as they do in MS Windows applications. |
| Scroll Bars, Box, and Arrows | Appears at the far right side and at the bottom of the screen. These buttons function just as they do in MS Windows applications. |
| Colors | Displays Appointments using colors found in the Client Window area on the Schedule correspond to the various Access Types that can be set up for a particular provider. |
Using the Resource Group Pane
The Resource Group Pane at the left-hand side of the screen lists both Resources and Resource Groups. If there is a plus sign (+), click it to expand the resource group to see all available resources. Click the minus sign (-) to collapse the group.
Dialog Boxes
Dialog boxes appear when the computer requires input from you or when an error occurs. In this manual, a dialog box is defined as any small box or screen that appears in front of the Scheduling interface and requests your attention or specific information. Most error dialog boxes ask you to click either OK or Cancel to acknowledge the error.
Changing the View
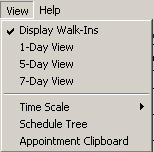
You can view the schedule in four modes: patients without appointments (walk-ins), 1-day, 5-day, or 7-day. The 1-day mode gives you maximum detail for a single day schedule. The 5-day and 7-day modes give you a view of five or seven days of the schedule from the selected date. Use the View menu shown in Figure 2-3 to change viewing modes.

Figure 2-3: View menu
1-Day View

Figure 2-4: Screen showing 1-Day view of schedule
5-Day View

Figure 2-5: Screen showing 5-Day view of schedule
7-Day View

Figure 2-6: Screen showing 7-Day view of schedule
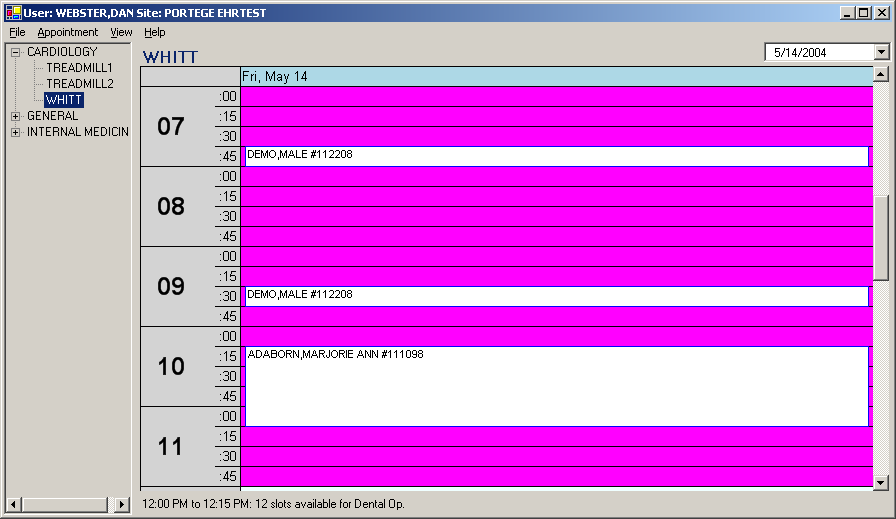
Appointment Window
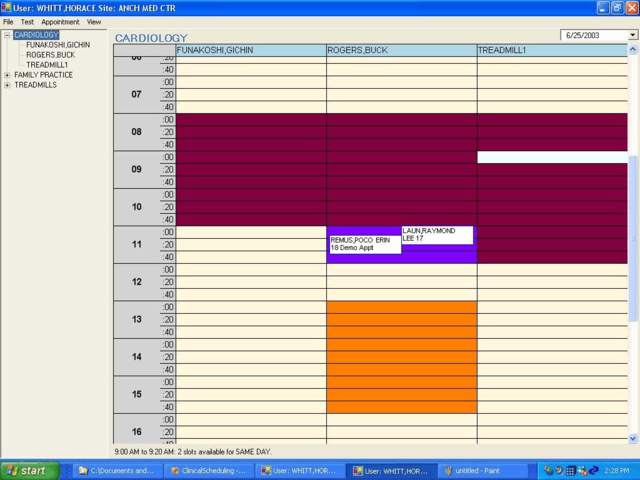
The appointment window shows the patient name, time of appointment, and notes. Figure 2-7 shows an appointment made for the 11:00-11:40 time slots for POCO REMUS. The patient selection is directly connected to VISTA. When an appointment is made, the appointment information is also stored in the VISTA scheduling package.

Figure 2-7: Appointment window & Resource Groups
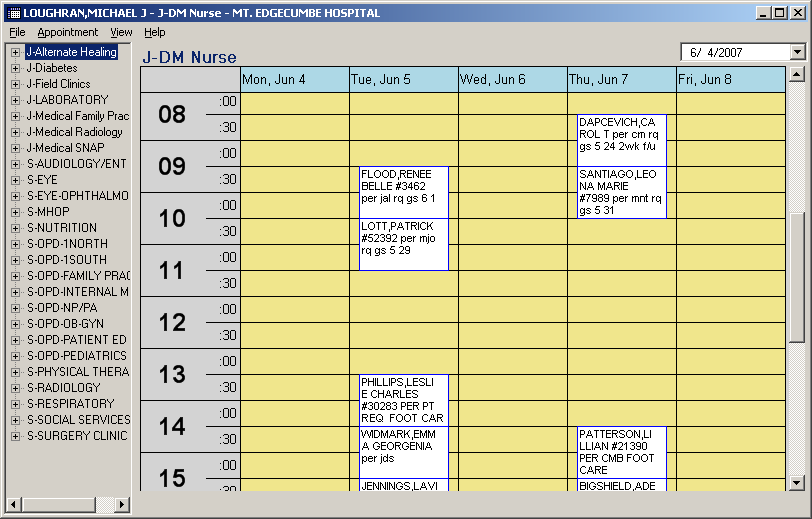
Resource Group View
You can view an entire Resource Group’s schedule for one day. Figure 2-7 (above) shows that you can look at an entire group of Resources. In this case, the appointment window for the cardiology group is shown and all three Resource schedules for June 25th are displayed. You can also drag an appointment from one Resource to another or from one time slot to another. To view a Resource Group’s schedule:
- Right Click a Resource Group.
- Click Open Schedule. The Resource Group schedule shown in Figure 2-7 (above) is displayed.
Day to Day Use
Managing Appointments
Opening or Viewing a Schedule for a Selected Resource
To view the schedule for a selected Resource:
- Select a Resource Group or individual Resource from the Resource Group pane. Expand and collapse the groups by clicking the plus sign (+) or minus sign (-) next to a group.
- Do one of the following:
- Double-click the Resource name and select Open Schedule from the File menu.
- Right-click the Resource name and select Open Schedule from the Resource Group pane.
You can also view the schedule of all Resources in a group by selecting the group and then double-clicking the group name.
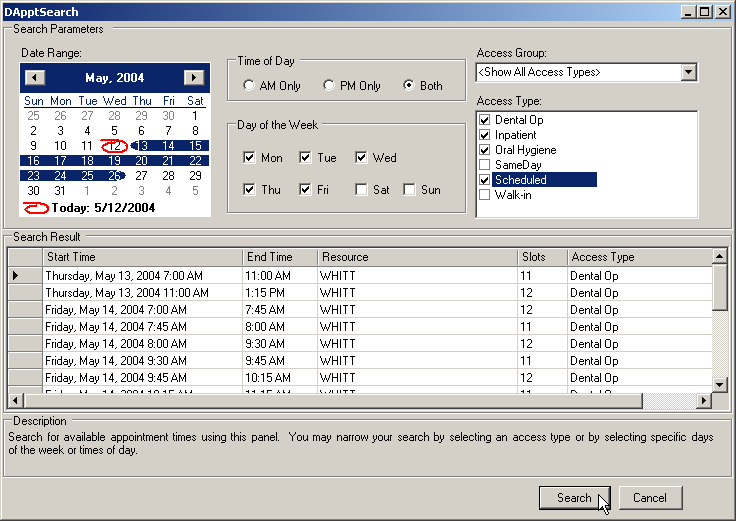
Finding an Available Appointment
You can search an entire Resource Group or specific Resource within a group for an available appointment using Find Available Appointment. To find an available appointment for a Resource Group or individual Resource:
- Click the Resource Group or individual Resource within a group on the Resource Group pane for which you want to find the available appointment.
- Do one of the following:
- On the Appointment Menu, click Find Available Appointment.
- Right-click on the Resource in the Resource Group pane, then click Find Available Appointment.
- Select the search parameter using the options in the Search Parameters box.
- In the Date Range box, select the range of dates in which you want to find an appointment. Click and drag the cursor from the beginning date to the ending date of the range. You can specify up to 14 consecutive days for your search.
- In the Time of Day box, click AM Only, PM Only, or Both.
- In the Day of the Week box, check the days of the week for which you want to find an appointment time.
- In the Access Group box, select the appropriate Access Group from the drop-down list.
- In the Access Type box, check all applicable Access Types for the appointment time you want to find.
- Click Search when you have finished selecting your search parameters. A list of available appointments is displayed in the Search Result box. If there are not any appointments available for the parameters you selected, you will instead see a "no availability found" message box.
")
Searching for an available appointment (results)
If there are multiple appointments available, scroll through the results list to find the appointment you want. You can change the order of the list by clicking any column heading in the search results.
To select an appointment, double-click anywhere on the row for that appointment. When you select an appointment from the list, the Scheduling window opens to that date. You can now make the appointment, following the process outlined below.
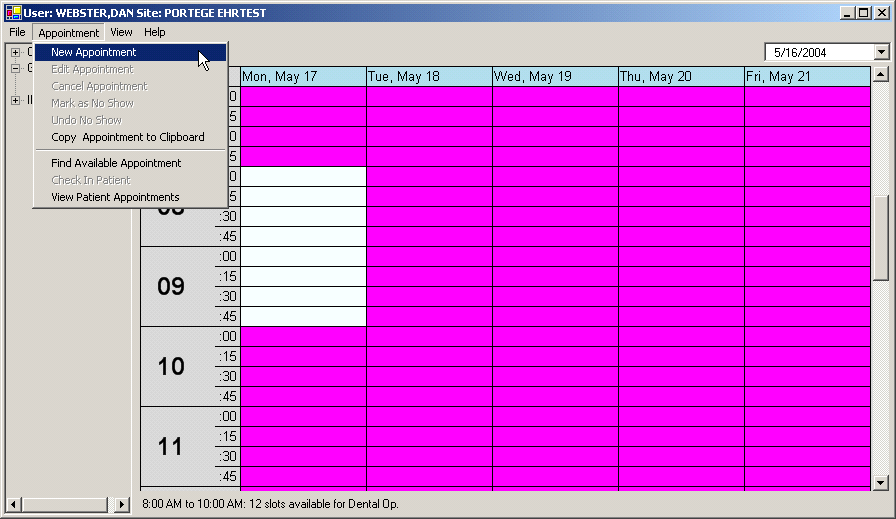
Making an Appointment
To create a new patient appointment:
- Click-and-hold over an area of the schedule that is available for appointments, and then drag the cursor to cover the entire time range needed for the appointment.
- Do one of the following:
- Click New Appointment from the Appointment menu.
- Right-click on the selected area, then click the Add Appointment option.
You should see the Select Patient window below.

Making an appointment (steps 1-4)
- Select a patient by typing lookup information (name, SSN, DOB, or HRN) in the Select Patient Search box. You may enter the first part of the patient's last name, the last 4 digits of the SSN, the entire SSN, HRN, or the DOB in the M-D-YYYY format.
- Press Return or click Search. If the system finds only one match, the fields are automatically populated in the Select Patient field. If there is more than one match, a list of available patients is displayed. To select from this list, double-click the patient and then click OK to confirm your selection. Note: You can also recall the last patient you typed in this field by pressing the Spacebar and then Return.
- Use the Patient Appointment dialog box to confirm the patient's contact information and to enter any relevant notes. The patient’s identification information shows in the Patient ID box, and the appointment information appears in the Appointment box. You can also click the Contact Information tab to view the patient’s contact information. The Contact Information tab is read-only; any changes made are not saved.
- Click OK to enter this appointment in the schedule.
Editing Appointment Information
This feature allows you to edit information in an appointment, while keeping the appointment at the same time. Please see the next section for instructions on how to change the time of an appointment. To edit appointment information:
- Select the appointment that you want to edit.
- Do one of the following:
- Right-click the appointment and then click Edit Appointment.
- Choose Edit Appointment from the Appointment menu.
This should open the Patient Appointment dialog box.
- Edit the appointment information as appropriate.
Changing Appointment Times
To change an appointment time:
- Click-and hold the appointment box.
- Drag the appointment to a new time slot. You can move appointments from one clinic to another by opening both clinic schedules, then clicking and dragging the appointment to the new time or Resource. This should call up a dialog box asking if you're sure you want to move the appointment.
- Click Yes to confirm or No to cancel the move.
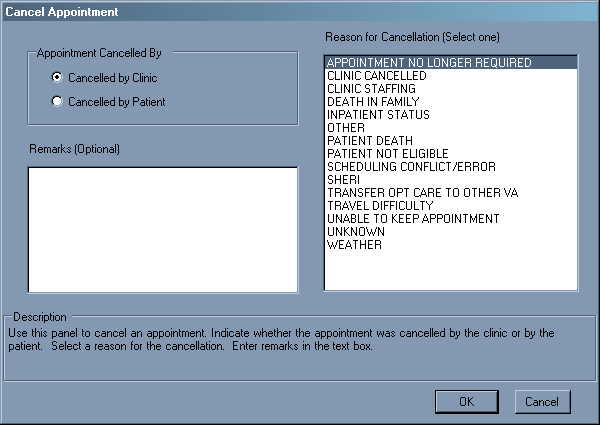
Deleting Appointments
- Click the appointment that you want to cancel.
- Click Cancel Appointment in the Appointment menu. This calls up the Cancel Appointment dialog box pictured below.

Cancel Appointment dialog box
- Click the appropriate button to select whether the appointment was cancelled by the clinic or by the patient in the Appointment Cancelled By group box.
- Click the appropriate reason for the cancellation in the Reason for Cancellation (Select one) list.
- Type any comments or remarks as needed in the Remarks (Optional) text box.
- Click OK to cancel the appointment or click Cancel to keep the appointment and return to the schedule.
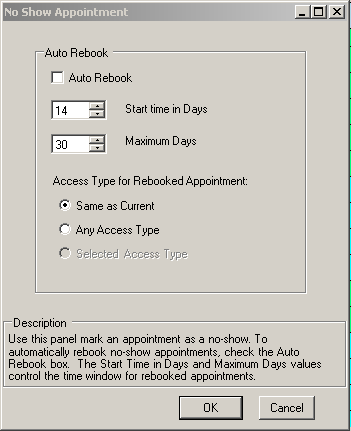
Marking a No-Show Appointment
- Click the appointment for the patient that you want to mark as a no show. Make certain that there is a thick box around the patient name.
- Choose Mark as No Show from the Appointment menu. This should call up the dialog box below.

No Show Appointment dialog box
- Do one of the following:
- To schedule another appointment for this patient, check Auto Rebook and change the Start time in Days and the Maximum Days as necessary using the arrows; choose an Access Type for the Rebooked Appointment as necessary; then click OK. The text and background colors change to show this patient as a no show.
- To dismiss this dialog box without scheduling another appointment, click Cancel.
Undoing a No-Show Appointment
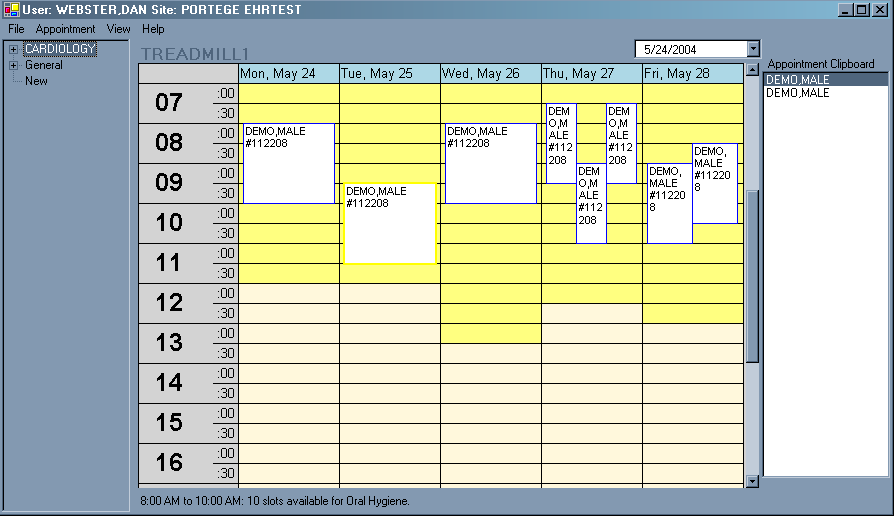
Using the Appointment Clipboard
You can use the Appointment Clipboard to set multiple appointments for a patient. This is an excellent tool when you are making several follow-up appointments at one time.
- Click Appointment Clipboard on the View menu after making an appointment. (See Making an Appointment on page 25 for more information.) The Appointment Clipboard pane is displayed on the right side of the screen as shown below.

Using the appointment clipboard
- Click-and-drag the patient name you want to the Appointment Clipboard pane.
- Release the patient name inside the Appointment Clipboard pane.
- Click the patient name in the Appointment Clipboard pane.
- Drag it to a new appointment. You can create as many appointments (in as many clinics) for this patient as necessary using this method.
Checking a Patient In
- Click the patient appointment you want to check in.
- Do one of the following:
- Click Check In Patient on the Appointment menu. The Appointment Check In dialog box shown in Figure 4-19 is displayed.
- Right-click on the patient appointment, then click Check In Patient. The Appointment Check In dialog box shown in Figure 4-19 is displayed
The current time and date are displayed in the Check In Time box. To adjust the check-in information, select the component of the time field that you want to change (month, day, year, hour, or minute) and then click the up or down arrows to adjust the value one increment up or down, or manually type a new value.
- Click OK to check the patient in, or click Cancel to cancel the check-in process.
Viewing and Printing
This section provides instructions for viewing and printing clinic schedules, patient letters, and patient appointments, as well as describing portions of the window and toolbar buttons related to the window.
Print Preview
When you select a print command, the Print Preview window opens after making your command selections. This section describes the different buttons in this window. Any button that is not available for selection is dimmed.
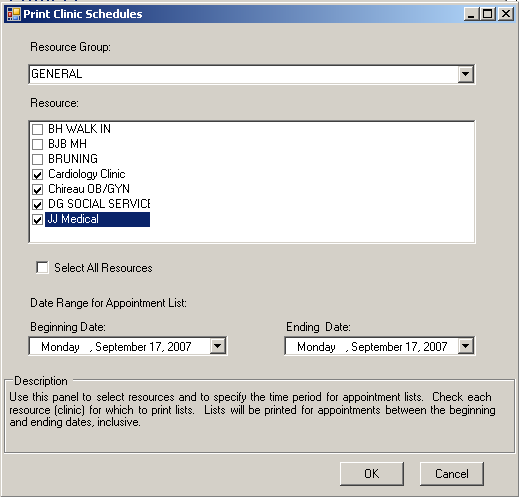
Printing Clinic Schedules
- Click Print Clinic Schedules from the File menu. The Print Clinic Schedules dialog box shown in Figure 5-2 is displayed.
- Select a Resource Group from the Resource Group drop-down list.
- Double click to select each individual resource or check the Select All Resources box to print resource schedules.
- Choose the Beginning Date and the Ending Date dates using the drop-down list.
- Click OK and the Print Preview window opens showing the clinic schedule. Figure 5-3 is provided as an example.
Attachments (15)
-
normal.png
(25.0 KB
) - added by 15 years ago.
Normal Schedule
-
basiclayout.png
(15.7 KB
) - added by 15 years ago.
Basic Layout
-
viewmenu.png
(16.8 KB
) - added by 15 years ago.
View Menu
-
1dayview.png
(15.0 KB
) - added by 15 years ago.
1 Day View
-
5dayview.png
(25.0 KB
) - added by 15 years ago.
5 Day View
-
7dayview.png
(24.4 KB
) - added by 15 years ago.
7 Day View
-
resourcegroup.png
(114.5 KB
) - added by 15 years ago.
Resource Group
-
initialview.png
(18.2 KB
) - added by 15 years ago.
Initial view of the Clinical Scheduling application after logging in
-
makeappt.png
(33.0 KB
) - added by 15 years ago.
Making an appointment
-
findapptsrchinaction.png
(18.4 KB
) - added by 15 years ago.
Searching for an available appointment (results)
-
cancelappt.png
(9.6 KB
) - added by 15 years ago.
Cancel Appointment dialog box
-
noshow.png
(7.9 KB
) - added by 15 years ago.
No Show Appointment dialog box
-
clipboard.png
(14.3 KB
) - added by 15 years ago.
Using the appointment clipboard
-
printclinicscheddialog.png
(10.2 KB
) - added by 15 years ago.
Print Clinic Schedules dialog box
-
printreminderlettersdialog.png
(9.1 KB
) - added by 15 years ago.
Print Reminder Letters dialog box
Download all attachments as: .zip