
Configure View
Configure the EDIS Display, List Selections, and Parameters
The Configure view lets authorized users configure the application to include locally meaningful pick lists and create customized electronic whiteboard displays. Specifically, the view provides subviews that allow users to configure:
Room and Area Configurations
The Room / Area subview enables you to:
- Add or configure rooms and areas
- Specify display names for rooms and areas
- Determine when the display board displays rooms and areas
- Select a default status for patients who occupy specific rooms or areas
- Mark rooms or areas inactive
- Select the occupancy category into which rooms and areas fall (single patient, multiple patient, and so forth)
- Indicate areas that contain two or more beds (for exposure reports)
- Specify the electronic white-board display on which rooms and areas appear
- Configure background and text colors for rooms and areas
Add, Configure, and Edit Rooms and Areas
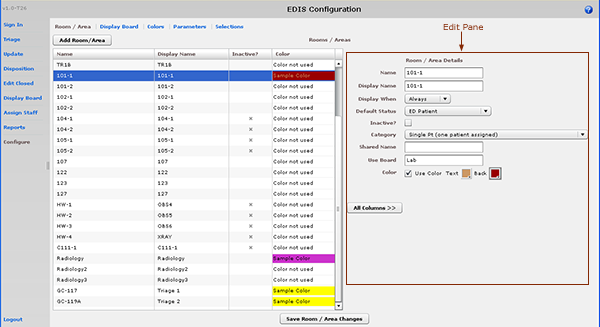
The Configuration view, Room / Area subview.
- Select the Room / Area subview. Keyboard: use the TAB key to locate the left-hand view-selection menu. Use the DOWN ARROW and UP ARROW keys to locate the Configure view. Use the SPACEBAR key to select this view. Use the TAB key to locate the Room / Area subview and use the SPACEBAR or ENTER key to select it.
- Click Add Room/Area. The application displays the Room / Area Edit pane and adds a new placeholder row in the Rooms / Areas grid. Keyboard: use the TAB key to locate the Add Room/Area button and use the SPACEBAR key to select it.
- To edit an existing room or area, click the room or area in the Rooms / Areas grid. Keyboard: use the TAB key to locate the Rooms / Areas grid. Use the DOWN ARROW key to enter the grid, and use the DOWN ARROW and UP ARROW keys to select a room or area.
-
In the Name box (Edit pane), replace the application’s placeholder name (new1) with the name of the room you want to add. The application does not support duplicate room or area names. Keyboard: use the TAB key to locate the Name box.
-
In the Display Name box, replace the placeholder name (new1) with the name you want EDIS to display. Keyboard: use the TAB key to locate the Display Name box.
-
Select one of the following three options from the Display When list: Occupied, Always, or Never. Your selection determines when EDIS includes the room or area on the electronic whiteboard display. Keyboard: use the TAB key to locate the Display When list. Use the DOWN ARROW and UP ARROW keys to select an option from this list.
-
To configure a default status for patients who are assigned to the new room (optional), select a status from the Default Status list. (Sites can configure their own selections for this list.) Keyboard: use the TAB key to locate the Default Status list. Use the DOWN ARROW and UP ARROW keys to select a default status from the list.
- If the new room or area is currently inactive, select the Inactive? check box. Keyboard: use the TAB key to locate the Inactive? check box. Use the SPACEBAR key to select (or cancel the selection of) the Inactive? check box.
-
From the Category list, select the occupancy category into which the room or area falls. Keyboard: use the TAB key to locate the Category list. Use the DOWN ARROW and UP ARROW keys to select an occupancy category from the list.
-
If a room or area contains two or more beds, type in the Shared Name box a name that associates the beds. For example, if area OBS contains two beds, OBS-1 and OBS-2, configure a room or area for each bed and type OBS in the Shared Name box for both OBS-1 and OBS-2. Keyboard: use the TAB key to locate the Shared Name box.
- If your site uses more than one electronic whiteboard display, type in the Use Board box the name of the display board on which the room or area will appear. All patients appear on the application’s main electronic whiteboard display. Keyboard: use the TAB key to locate the Use Board box.
- Configure a text and/or background color for the room or area (optional).
-
To dismiss the Edit pane and view all columns in the Rooms / Areas grid, click All Columns. Keyboard: use the TAB key to locate the All Columns button and use the SPACEBAR key to select it.
- Click Save Room / Area Changes to save your changes. The application displays an Alert message that tells you it has successfully saved your changes. Click Close to dismiss this message. Keyboard: use the TAB key to locate the Save Room / Area Changes button. Use the SPACEBAR key to select the Save Room / Area Changes button. Use the TAB key to locate the Close button, use the SPACEBAR key to select the Close button.
Configuring Color for Rooms and Areas
The application allows you to configure text and background colors for rooms and areas.
-
Select the Use Color check box. Keyboard: use the TAB key to locate the Use Color check box. Use the SPACEBAR key to select (or cancel the selection of) this check box.
- To configure a color for text, click the color-selection box labeled Text. EDIS displays a color-selection grid (
 ).
).
- Click a color in the grid to select a text color. General keyboard actions are not available for this step; however, Job Access with Speech (JAWS) users can type in hexadecimal color codes for text.
- To configure a background color, click the color-selection box labeled Back. EDIS displays a color-selection grid.
- Click a color in the grid to select a background color. General keyboard actions are not available for this step; however, JAWS users can type hexadecimal color codes for for backgrounds.
- Click Save Room / Area Changes to save your changes. The application displays an Alert message that tells you it has successfully saved your changes. Click Close to dismiss this message. Keyboard: use the TAB key to locate the Save Room / Area Changes button. Use the SPACEBAR key to select the Save Room / Area Changes button. Use the TAB key to locate the Close button, use the SPACEBAR key to select the Close button.
| Note: |
Colors you configure for room and area assignments will not appear on the display board unless colors (in general) are enabled for room and area selections in the Configuration view’s Display Board subview. (See Configure or Edit Display Board Columns for more information) |
Specifying the Order of Rooms and Areas
Use a drag and drop operation to change the order of rooms and areas in the Rooms / Areas grid. EDIS bases the order of its Room / Area selection lists on the order of rooms and areas in the Rooms / Areas grid. Keyboard actions are not available for drag-and-drop operations.
Top
Display Board Configurations
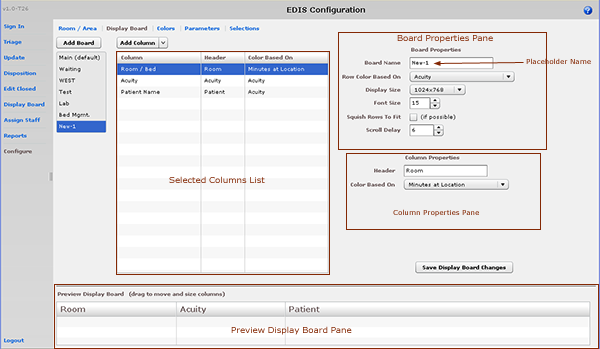
The Configure view—Display Board subview.
The Display Board subview enables you to:
- Add a new display board
- Add or remove display-board columns
- Edit column headers
- Identify information upon which you want to base cell colors in display-board columns
- Identify information upon which you want to base colors in display-board rows
- Reposition and resize display board columns
- Select optimal display sizes
- Select font sizes
- Set scroll-delay times
- Compress (squish) all data rows into a single view (if possible)
- Save display-board configuration changes
EDIS enables you to configure each display board separately. Simply select the board you want to configure in the Board Name list. The application displays editable information about the board in the Board Properties pane.
EDIS enables you to create multiple display boards. However, be advised: you cannot delete display boards after you've saved them.
-
Click Add Board. EDIS adds a placeholder name (New-1) in the Board Name list and the Board Name box, which is located in the Board Properties pane. Keyboard: use the TAB key to locate the Add Board button and use the SPACEBAR key to select the button.
- In the Board Name box, replace the placeholder name with the name you want to use for this new display board. Keyboard: use the TAB key to locate the Board Name box.
- (Optional) In the Row Color Based On list, select a display-board item upon which you want to base row colors. Keyboard: use the TAB key to locate the Row Color Based On list. Use the DOWN ARROW and UP ARROW keys to select an item from the list.
- In the Display Size list, select the screen size of your new display board. Display sizes are site configurable. If the Display Size list does not contain your new board’s screen size, check with your site’s CAC or IRM staff. Keyboard: use the TAB key to locate the Display Size list. Use the DOWN ARROW and UP ARROW keys to select a display size from the list.
- In the Font Size box, type or select a font size for your new display board. Available font sizes range from six to 36 points. The Preview Display Board pane dynamically displays your font choices. Keyboard: use the TAB key to locate the Font Size box. Type a font size, or use the DOWN ARROW and UP ARROW keys to select a font size.
- (Optional) Select the Squish Rows To Fit (if possible) check box. This selection allows EDIS to compress all data rows to completely fit within your site’s display screen, if this is possible. To ensure readability, the application compresses data only down to a row size of 18 points and a font size of nine points. If, after applying the maximum compression, your site’s data will still not fit within a single display view, the application applies scrolling functionality and restores the display board’s font size to the value you specified in the Font Size box. Keyboard: use the TAB key to locate the Squish (if possible) check box. Use the SPACEBAR key to select—or cancel the selection of—the check box.
- In the Scroll Delay box, type or select a scroll-delay time (in seconds). The application automatically activates scrolling when the screen’s real estate is not sufficient to display all of the patients who are currently on the Active Patients list. The delay-time setting determines how long screen contents remain stationary. For example, suppose your display can accommodate only 20 patients and 25 patients are currently on the list. Further, suppose that the EDIS scroll-delay time is set at five seconds. In this case, EDIS displays the first 20 patients for five seconds, then scrolls to display the remaining five patients for five seconds, and so forth. Keyboard: use the TAB key to locate the Scroll Delay box. Type a delay time or use the UP ARROW and DOWN ARROW keys to select a delay time.
| Note: |
EDIS refreshes the display board every 30 seconds. Each refresh resets the display-board view. Set scroll-delay intervals that allow the application to display all patients within the span of a single refresh cycle. (JAWS users can disable automatic refresh functionality and manually refresh the display board by pressing the F7
key. However, automatic refresh is disabled only when JAWS is running.) |
Display boards can include any of the following columns:
- Room/Bed: the rooms, beds, and areas associated with the display board
- Patient Name: patients' surnames
- Patient X9999: the first initials of patients' surnames concatenated with the last four digits of their Social Security numbers (SSNs)
- Visit Created: checkmarks that indicate EDIS has created visits for patients in CPRS or blank spaces that indicate EDIS has not created visits
- Complaint: patients' display-board complaints
- Comments: comments that users have entered via the Update view
- Provider Initials: the initials of providers whom users have selected via the Triage, Update, or Disposition view
- Resident Initials: the initials of residents whom users have selected via the Triage, Update, or Disposition view
- Nurse Initials: the initials of nurses whom users have selected via the Triage or Update view
- Acuity: acuities users have entered via the Triage view
- Status: statuses users have entered via the Update and Disposition views
- Lab Active/Complete: the number of active laboratory orders associated with patients' emergency-department visits over the number of completed laboratory orders
- Imaging Active/Complete: the number of active imaging orders associated with patients' emergency-department visits over the number of completed imaging orders
- New (Unverified) Orders: the number of unverified orders associated with patients' emergency-department visits (for sites using CPRS 26, EDIS decrements this number when unverified orders are completed; for sites using CPRS 27, EDIS decrements this number when unverified orders are verified)
- Total Minutes: the number of minutes from patients' time-in values (the times users added patients to—or identified them in—EDIS) to the present
- Minutes at Location: the number of minutes patients have been assigned to their present locations
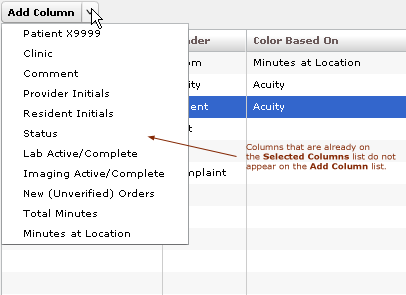
The Add Column list.
- Click to open the Add Column list. Keyboard: use the TAB key to locate the Add Column list. Press the SPACEBAR key to open the list.
- Click to select a column name from the Add Column list. The Preview Display Board pane dynamically displays columns as you add them. Keyboard: use the DOWN ARROW and UP ARROW keys to locate the name of the column you want to add. Use the SPACEBAR or ENTER key to select the column.
- Repeat steps 1 and 2 as necessary. Keyboard: the application maintains its focus on the Add Column list, so you won’t need to relocate the list with each new column addition. Press the SPACEBAR key to reopen the list.
| Note: |
After you add columns, you can specify their order using a drag-and-drop operation. (See Specify the Order of Display Board Columns.) However, keyboard operations are not available for post-addition column ordering. If you exclusively use keyboard actions, please add columns in the order you want them to appear on your electronic whiteboard display. |
You can remove columns from the Selected Columns list in any of the following ways:
- Remove a single column: click an individual column in the Selected Columns list and press the DELETE key. Keyboard: use the TAB key to locate the Selected Columns list. Use the DOWN ARROW and UP ARROW keys to select the column you want to remove. Press the DELETE key to remove the column.
- Remove a group of columns: select a group of columns in the Selected Columns list by clicking the first column in the group, then pressing and holding down the CTRL key as you click the remaining columns. Release the CTRL key and press the DELETE key to remove the group. Keyboard: use the TAB key to locate the Selected Columns list. Use the DOWN ARROW and UP ARROW keys to select the first column in the group. Press and hold down the CTRL key while using the DOWN ARROW and UP ARROW keys to locate additional columns in the group. Press the SPACEBAR key to select each column. Release the CTRL key and press the DELETE key to delete the group.
- Remove a range of columns: select a range of columns in the Selected Columns list by clicking the first column in the range, then pressing and holding down the SHIFT key as you click the last column. Release the SHIFT key and press the DELETE key to remove the range. Keyboard: use the TAB key to locate the Selected Columns list. Use the UP ARROW and DOWN ARROW keys to locate the first column in the range. Press and hold down the SHIFT key while using the UP ARROW or DOWN ARROW key to select the remaining columns in the range. Release the SHIFT key and press the DELETE key to remove the range.
- In the Selected Columns list, click the column whose properties you want to configure or edit. Keyboard: use the TAB key to locate the Selected Columns list. Use the DOWN ARROW key to enter the list. Use the DOWN ARROW and UP ARROW keys to locate the column you want to configure.
- In the Header box, which is located in the Column Properties pane, replace the application’s default or current header (optional). Keyboard: use the TAB key to locate the Header box.
- Select an item in the Color Based On list (optional). Your selection here determines the criteria the application uses to display color configurations in electronic whiteboard display columns. The application gives preference to colors you configure for columns over colors you configure for rows. List items include: Status / Acuity, Status, Acuity, Room / Bed, Provider, Resident, Nurse, Urgency – Lab, Urgency – Radiology, Total Elapsed Minutes, Minutes at Location, Minutes for Lab Order, Minutes for Imaging Order, and Minutes for Unverified Order.
| Note: |
Although you configure color selections in the Assign Staff view and the Colors and Room / Area subviews, the Display Board subview of the Configuration view is where you determine which of these colors the board displays and where it displays them.
Your selection determines which color or colors appear on the display board for the column youve selected. For example, suppose you select the Status column. Then suppose you click this columns Color Based On list and select Acuity. In this case, the board will display in its Status column colors you have configured for acuity. |
You can specify the order of electronic whiteboard display columns by using a drag-and-drop operation in either the Preview Display Board pane or the Selected Columns list.
To perform a drag-and-drop operation, click a column header and, without releasing your mouse button, move the header to its new location. Release the mouse button. Keyboard actions are not available for drag-and-drop operations. To reorder columns using your keyboard, remove columns in the Selected Columns list and re-add them in the order you want them to appear on the electronic whiteboard display.
You resize columns in the Preview Display Board pane by using a drag-and-drop operation (keyboard actions are not available):
- Point your mouse at the border of the column you want to resize.
- When your mouse pointer becomes a slider (
 ), hold down your right mouse button and drag the boarder to resize the column.
- Release your mouse button.
Click Save Display Board Changes. EDIS displays an Alert message to confirm that it has successfully saved your changes. Click Close to dismiss this message. Keyboard: use the TAB key to locate the Save Display Board Changes button. Press the
SPACEBAR
key to select the button. Use the TAB key to locate the Close button, and use the
SPACEBAR
key to select it.
Top
Configure Colors
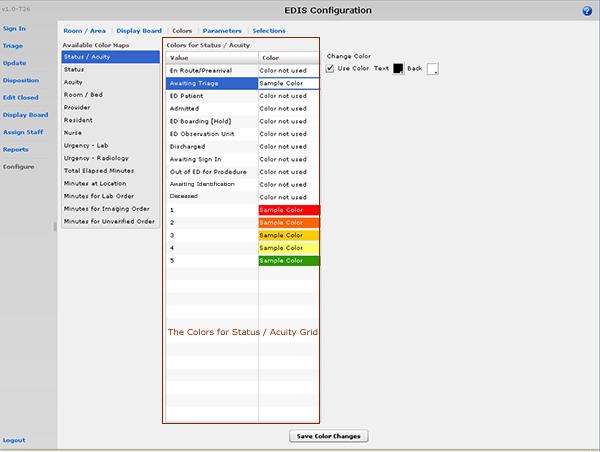
The Configure view—Colors subview, Status / Acuity selected.
The Colors subview enables you to configure colors for the following items:
You can configure colors for all status values. The following initial values ship with the application:
- Admitted
- Awaiting Triage
- ED Boarding [Hold]
- ED Observation Unit
- ED Patient
- En Route/Prearrival
- Discharged
You can also configure colors for the following acuity values (the application supports Emergency Severity Index [ESI] acuity values):
- 1 (most urgent)
- 2
- 3
- 4
- 5 (least urgent)
In addition, you can use the Status / Acuity selection to configure colors for the combined set of status and acuity values.
| Note: |
Color-map selections in the Colors subview must match at least one color selection in the Display Board subview. For example, if you configure colors using the Status / Acuity selection in the Colors subview, select Status / Acuity in the Colors Based On column or Row Color list in the Display Board subview. Also note: if you configure colors for the Status/Acuity selection and also for the Acuity and/or Status selections, the application will display the colors you configured for Status / Acuity. |
- In the Available Color Maps list, select Status, Acuity, or Status / Acuity. EDIS displays the Colors for Status, Colors for Acuity, or Colors for Status / Acuity grid, respectively. Keyboard: use the TAB key to locate the Available Color Maps list. Use the DOWN ARROW or UP ARROW key to select Status / Acuity, Status, or Acuity.
- To configure colors for a value listed in the grid, select the value. Keyboard: use the TAB key to locate the grid. Use the DOWN ARROW and UP ARROW key s to select a value within the grid.
- Click the Use Color check box. The application displays text and background color-selection boxes. Keyboard: use the TAB key to locate the Use Color check box. Use the SPACEBAR key to select the check box.
- To configure a color for the values text, click the Text color-selection box. The application displays a color-selection grid. Click a color within the grid to select the color. General keyboard instructions are not available for this step; however, JAWS users can type in hexadecimal color codes.
The color grid.
- To configure a color for the values background, click the Back color-selection box. The application displays a color-selection grid. Click a color within the grid to select the background color. General keyboard instructions are not available for this step; however, JAWS users can type in hexadecimal color codes.
- Repeat steps 15 to configure colors for additional values.
-
Click Save Color Changes to save your color configurations. The application displays an Alert message to inform you that it has saved your color selections. Click Close to dismiss this message. Keyboard: use the TAB key to locate Save Color Changes and use the SPACEBAR key to select it. Use the TAB key to locate the Close button and use the SPACEBAR key to select it.

The Colors for Urgency - Lab grid.
You can configure colors for the following values:
- No Orders
- Active Orders
- STAT Orders
- In the Available Color Maps list, select Urgency – Lab. EDIS displays the Colors for Urgency Lab grid. Keyboard: use the TAB key to locate the Available Color Maps list. Use the DOWN ARROW key to enter the list, and use the DOWN ARROW or UP ARROW key to locate Urgency – Lab.
- To configure colors for a value listed in the grid, select the value, then select the Use Color check box. Keyboard: use the TAB key to locate the Urgency – Lab grid. Use the DOWN ARROW and UP ARROW keys to select a value in the grid. Use the TAB key to locate the Use Color check box, and use the SPACEBAR key to select it.
- To configure a color for the values text, click the Text color-selection box. The application displays a color-selection grid. Click a color within the grid to select a text color. General keyboard instructions are not available for this step; however, JAWS users can type in hexadecimal color codes.
- To configure a color for the values background, click the Back color-selection box. The application displays a color-selection grid. Click a color within the grid to select a background color. General keyboard instructions are not available for this step; however, JAWS users can type in hexadecimal color codes.
- Repeat steps 24 to configure colors for additional values.
- Click Save Color Changes to save your color configurations. The application displays an Alert message to inform you that it has saved your color selections. Click Close to dismiss this message. Keyboard: use the TAB key to locate Save Color Changes and use the SPACEBAR key to select it. Use the TAB key to locate the Close button and use the SPACEBAR key to select it.
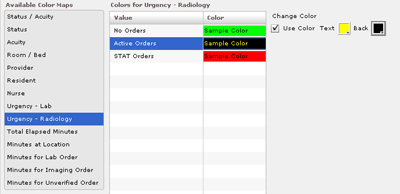
Colors for Urgency - Radiology grid.
You can configure colors for the following values:
- No Orders
- Active Orders
- STAT Orders
- In the Available Color Maps list, select Urgency – Radiology. EDIS displays the Colors for Urgency Radiology grid. Keyboard: use the TAB key to locate the Available Color Maps list. Use the DOWN ARROW and UP ARROW keys to select Urgency – Radiology.
- To configure colors for a value listed in the grid, select the value, then select the Use Color check box. Keyboard: use the TAB key to locate the Colors for Urgency – Radiology grid. Use the DOWN ARROW and UP ARROW keys to select a value. Use the TAB key to locate the Use Color check box and use the SPACEBAR key to select it.
- To configure a color for the values text, click the Text color-selection box. The application displays a color-selection grid. Click a color within the grid to select a text color. General keyboard actions are not available for this step; however, JAWS users may type in hexadecimal color codes.
- To configure a color for the values background, click the Back color-selection box. The application displays a color-selection grid. Click a color within the grid to select a background color. General keyboard actions are not available for this step; however, JAWS users may type in hexadecimal color codes.
- Repeat steps 24 to configure colors for additional values.
- Click Save Color Changes to save your color configurations. The application displays an Alert message to inform you that it has saved your color selections. Click Close to dismiss this message. Keyboard: use the TAB key to locate Save Color Changes and use the SPACEBAR key to select it. Use the TAB key to locate the Close button and use the SPACEBAR key to select it.
The application measures total elapsed minutes from patients' time-in values.
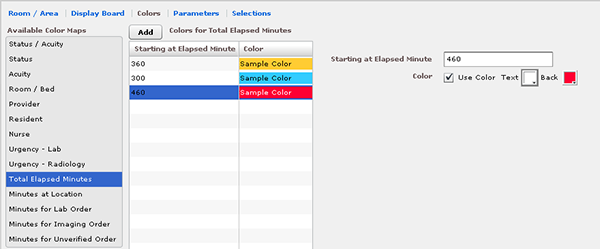
Configure colors for the Total Elapsed Minutes selection.
- Select Total Elapsed Minutes in the Available Color Maps list. The application displays the Colors for Total Elapsed Minutes grid. Keyboard: use the TAB key to locate the Available Color Maps list. Use the DOWN ARROW and UP ARROW keys to select Total Elapsed Minutes.
- To add a time value to the Starting at Elapsed Minute column, click Add. The application displays the Starting at Elapsed Minute box. Keyboard: use the TAB key to locate the Add button and use the SPACEBAR key to select the button.
- Type a starting value in the Starting at Elapsed Minute box. EDIS uses this value to determine when to display your color configuration. Keyboard: use the TAB key to locate the Starting at Elapsed Minute box.
- To associate a color with this value, select the Use Color check box. Keyboard: use the TAB key to locate the Use Color check box and use the SPACEBAR key to select it.
- To configure a color for the values text, click the Text color-selection box. The application displays a color-selection grid. Click a color within the grid to select a text color. General keyboard actions are not available for this step; however, JAWS users may type in hexadecimal color codes.
- To configure a color for the values background, click the Back color-selection box. The application displays a color-selection grid. Click a color within the grid to select a background color. General keyboard actions are not available for this step; however, JAWS users may type in hexadecimal color codes.
- Repeat steps 26 to configure colors for additional values.
- Click Save Color Changes to save your color configurations. The application displays an Alert message to inform you that it has saved your color selections. Click Close to dismiss this message. Keyboard: use the TAB key to locate Save Color Changes and use the SPACEBAR key to select it. Use the TAB key to locate the Close button and use the SPACEBAR key to select it.
The application measures elapsed time from patients' most recent room assignments.
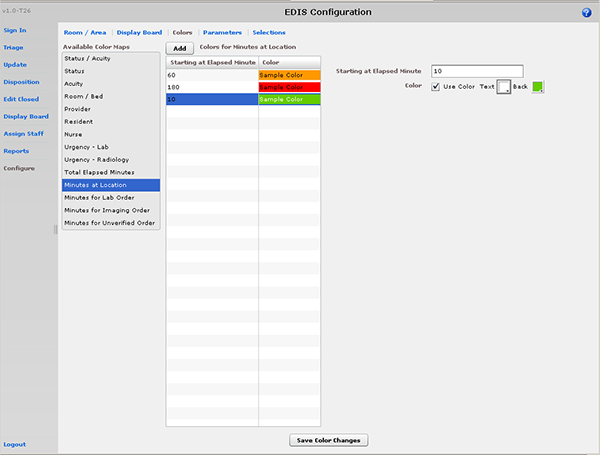
The Colors for Minutes at Location grid.
- Select Minutes at Location in the Available Color Maps list. The application displays the Colors for Minutes at Location grid. Keyboard: use the TAB key to locate the Available Color Maps list. Use the DOWN ARROW and UP ARROW keys to select Minutes at Location.
- To add a time value to the Starting at Elapsed Minute column, click Add. The application displays the Starting at Elapsed Minute box. Keyboard: use the TAB key to locate the Add button.
- Type a starting value in the Starting at Elapsed Minute box. Keyboard: use the TAB key to locate the Starting at Elapsed Minute box.
- To associate a color with this value, select the Use Color check box. Keyboard: use the TAB key to locate the Use Color check box and use the SPACEBAR key to select it.
- To configure a color for the values text, click the Text color-selection box. The application displays a color-selection grid. Click a color within the grid to select a text color. General keyboard actions are not available for this step; however JAWS users can type in hexadecimal color codes.
- To configure a color for the values background, click the Back color-selection box. The application displays a color-selection grid. Click a color within the grid to select a background color. General keyboard actions are not available for this step; however JAWS users can type in hexadecimal color codes.
- Repeat steps 26 to configure colors for additional values.
-
Click Save Color Changes to save your color configurations. The application displays an Alert message to inform you that it has saved your color selections. Click Close to dismiss this message. Keyboard: use the TAB key to locate Save Color Changes and use the SPACEBAR key to select it. Use the TAB key to locate the Close button and use the SPACEBAR key to select it.
Values measure elapsed time from orders' release to the laboratory.
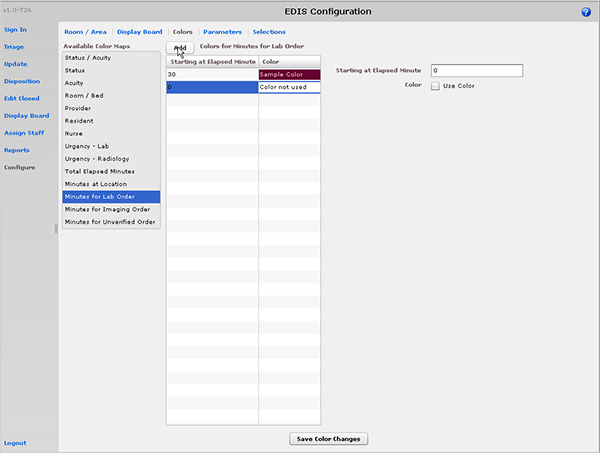
The Colors for Minutes for Lab Order grid.
- Select Minutes for Lab Order in the Available Color Maps list. The application displays the Colors for Minutes for Lab Order grid. Keyboard: use the TAB key to locate the Available Color Maps list. Use the DOWN ARROW and UP ARROW keys to select Minutes for Lab Order.
- To add a time value to the Starting at Elapsed Minute column, click Add. The application displays the Starting at Elapsed Minute box. Keyboard: use the TAB key to locate the Add button.
- Type a starting value in the Starting at Elapsed Minute box. Keyboard: use the TAB key to locate the Starting at Elapsed Minute box.
- To associate a color with this value, select the Use Color check box. Keyboard: use the TAB key to locate the Use Color check box and use the SPACEBAR key to select the check box.
- To configure a color for the values text, click the Text color-selection box. The application displays a color-selection grid. Click a color within the grid to select a text color. General keyboard actions are not available for this step; however, JAWS users can type in hexadecimal color codes.
- To configure a color for the values background, click the Back color-selection box. The application displays a color-selection grid. Click a color within the grid to select a background color. General keyboard actions are not available for this step; however, JAWS users can type in hexadecimal color codes.
- Repeat steps 26 to configure colors for additional values.
- Click Save Color Changes to save your color configurations. The application displays an Alert message to inform you that it has saved your color selections. Click Close to dismiss this message. Keyboard: use the TAB key to locate Save Color Changes and use the SPACEBAR key to select it. Use the TAB key to locate the Close button and use the SPACEBAR key to select it.
Values measure elapsed time from orders' release to radiology.
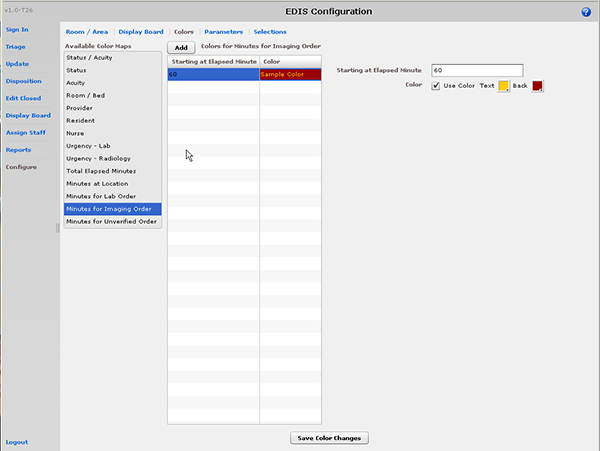
The Colors for Minutes for Imaging Order grid.
- Select Minutes for Imaging Order in the Available Color Maps list. The application displays the Colors for Minutes for Imaging Order grid. Keyboard: use the TAB key to locate the Available Color Maps list. Use the DOWN ARROW and UP ARROW keys to select Minutes for Imaging Order.
- To add a time value to the Starting at Elapsed Minute column, click Add. The application displays the Starting at Elapsed Minute box. Keyboard: use the TAB key to locate the Add button and use the SPACEBAR key to select the button.
- Type a starting value in the Starting at Elapsed Minute box. Keyboard: use the TAB key to locate the Starting at Elapsed Minute box.
- To associate a color with this value, select the Use Color check box. Keyboard: use the TAB key to locate the Use Color check box and use the SPACEBAR key to select the check box.
- To configure a color for the values text, click the Text color-selection box. The application displays a color-selection grid. Click a color within the grid to select a text color. General keyboard actions are not available for this step; however, JAWS users can type in hexadecimal color codes.
- To configure a color for the values background, click the Back color-selection box. The application displays a color-selection grid. Click a color within the grid to select a background color. General keyboard actions are not available for this step; however, JAWS users can type in hexadecimal color codes.
- Repeat steps 26 to configure colors for additional values.
- Click Save Color Changes to save your color configurations. The application displays an Alert message to inform you that it has saved your color selections. Click Close to dismiss this message. Keyboard: use the TAB key to locate Save Color Changes and use the SPACEBAR key to select it. Use the TAB key to locate the Close button and use the SPACEBAR key to select it.
Values measure elapsed time from orders' release.
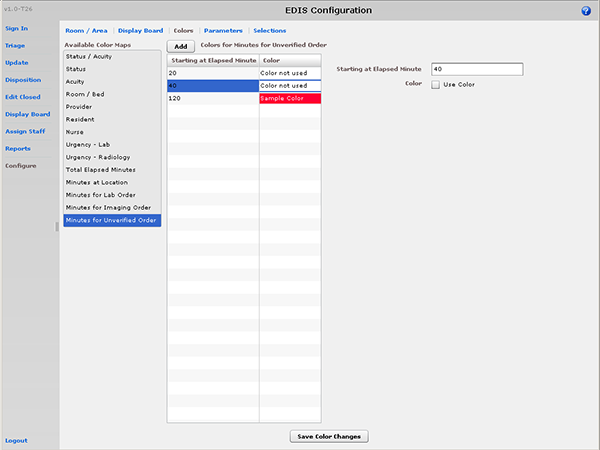
The Colors for Minutes for Unverified Order grid.
- Select Minutes for Unverified Order in the Available Color Maps list. The application displays the Colors for Minutes for Unverified Order grid. Keyboard: use the TAB key to locate the Available Color Maps list. Use the DOWN ARROW and UP ARROW keys to select Minutes for Unverified Order.
- To add a time value to the Starting at Elapsed Minute column, click Add. The application displays the Starting at Elapsed Minute box. Keyboard: use the TAB key to locate the Add button and press the SPACEBAR key to select it.
-
Type a starting value in the Starting at Elapsed Minute box. Keyboard: use the TAB key to locate the Starting at Elapsed Minute box.
- To associate a color with this value, select the Use Color check box. Keyboard: use the TAB key to locate the Use Color check box and use the SPACEBAR key to select the check box.
- To configure a color for the values text, click the Text color-selection box. The application displays a color-selection grid. Click a color within the grid to select a text color. General keyboard actions are not available for this step; however, JAWS users can type in hexadecimal color codes.
- To configure a color for the values background, click the Back color-selection box. The application displays a color-selection grid. Click a color within the grid to select a background color. General keyboard actions are not available for this step; however, JAWS users can type in hexadecimal color codes.
- Repeat steps 26 to configure colors for additional values.
- Click Save Color Changes to save your color configurations. The application displays an Alert message to inform you that it has saved your color selections. Click Close to dismiss this message. Keyboard: use the TAB key to locate Save Color Changes and use the SPACEBAR key to select it. Use the TAB key to locate the Close button and use the SPACEBAR key to select it.
Top
Configure Parameters
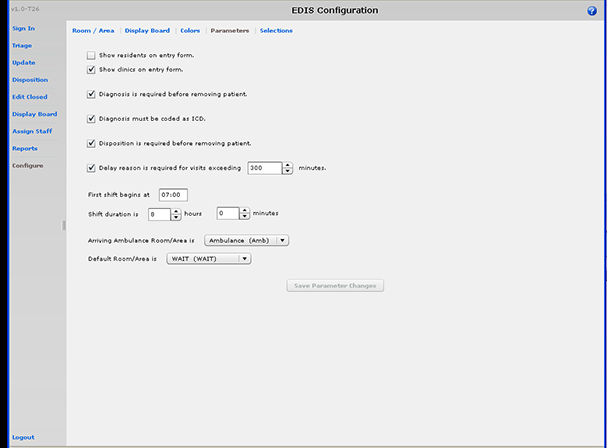
The Configure view—Parameters subview.
The Parameters subview allows you to set the following parameters:
- Show residents on entry form. This parameter enables sites that have residents to include them on the applications data-entry views. Resident-selection lists appear on the Triage, Update, Disposition, and Edit Closed views.
- Diagnosis is required before removing a patient. When sites select this parameter, EDIS requires emergency-department personnel to enter diagnoses as a precondition to removing patients from the display board—unless the patient's disposition is one of the following: Patient Name Entered in Error, Left Without Being Treated/Seen, or Sent to Nurse Eval / Drop In Clinic.
- Diagnosis must be coded as ICD. When sites select this parameter, the application uses VistAs ICD-9-CM search for all diagnosis entries. When sites do not select this parameter, the application provides a free-text field for recording diagnoses.
- Disposition is required before removing patient. When sites select this parameter, the application requires emergency department personnel to enter dispositions before removing patients from the display board.
- Delay reason is required for visits exceeding [site-specified] minutes. When sites select this parameter, the application does not allow users to remove patients whose stays have exceeded a specific number of minutes without first entering a reason for delay—unless the patient's disposition indicates that he or she has been assigned to an observation ward.
- Arriving Ambulance Room/Area is. This parameter enables sites to select a default room or area for patients who are arriving by ambulance or other emergency-transport vehicles.
- Default Room/Area is. This parameter enables sites to select a default room or area.
The Parameters subview also enables you to specify shift start times and durations. The application uses this information to pull data for shift reports.
Include Residents on Entry Form
- Select the Show residents on entry form check box. Keyboard: use the TAB key to locate the Show residents on entry form check box. Use the SPACEBAR key to select the checkbox.
- Clear the check box to remove the resident-selection list from the entry form. Keyboard: use the SPACEBAR key to clear the selection of the check box.
Require a Diagnosis
- Select the Diagnosis is required before removing patient check box. Keyboard: use the TAB key to locate the Diagnosis is required before removing patient check box. Use the SPACEBAR key to select the check box.
- Clear the check box to remove the requirement. Keyboard: use the SPACEBAR key to clear the check box.
Require ICD-9-CM or Free-text Diagnoses
- To require ICD-9-CM diagnoses, select the Diagnosis must be coded as ICD check box. Keyboard: use the TAB key to locate the Diagnosis must be coded as ICD check box. Use the SPACEBAR key to select the check box.
- To require free-text diagnoses, do not select—or clear the selection of—the Diagnosis must be coded as ICD check box. Keyboard: use the SPACEBAR key to clear the selection of the check box.
Require Disposition to Remove Patient
- Select the Disposition is required before removing patient check box. Keyboard: use the TAB key to locate the Disposition is required before removing patient check box. Use the SPACEBAR key to select the check box.
- To remove the requirement, clear the check box. Keyboard: use the SPACEBAR key to clear the check box.
Require a Reason for Delay
- Select the Delay reason is required for visits exceeding ... minutes check box. In the minutes box, type or select a number of minutes after which the application should require a reason for delay. Keyboard: use the TAB key to locate the Delay reason is required for visits exceeding ...minutes check box. Use the SPACEBAR key to select the check box. Use the TAB key to locate the minutes box. Type a number of minutes or use the UP ARROW or DOWN ARROW key to select a number of minutes.
| Note: |
The national visit limit for emergency departments is currently six hours (360 minutes). |
- Clear the check box to remove the requirement. Keyboard: use the SPACEBAR key to clear the check box.
Configure Shift Parameters
- In the First shift begins at box, type the time (in hours and minutes—hh:mm) your sites first shift begins. Keyboard: use the TAB key to locate the First shift begins at box.
- In the Shift duration is
hours and minutes boxes, type or select the hours and minutes that mark the duration of your sites shifts. Keyboard: use the TAB key to locate the Shift duration is ...hours and minutes boxes. Type hours and minutes or use the UP ARROW or DOWN ARROW key to select hours and minutes.
Set a Default Room or Area for Patients Arriving by Ambulance
Select a room or area from the Arriving Ambulance Room/Area is list. Keyboard: use the TAB key to locate the Arriving Ambulance Room/Area is list. Use the UP ARROW or DOWN ARROW key to select a default room or area from the list.
Set a Default Room or Area
Select a room or area from the Default Room/Area is list. Keyboard: use the TAB key to locate the Default Room/Area is list. Use the UP ARROW or DOWN ARROW key to select a default room or area from the list.
Save Parameter Selections
Click Save Parameter Changes. The application displays an Alert message to inform you that it has successfully saved your changes. Click Close to dismiss this message. Keyboard: use the TAB key to locate the Save Parameter Changes button. Use the SPACEBAR key to select the button. Use the TAB key to locate the Close button and use the SPACEBAR key to select it.
Some parameter settings require you to log out of the application and log back in. For example, if you select the Diagnosis must be coded as ICD check box, you must log out and log back in to see the change on the application’s Disposition view. Likewise, after selecting the Show residents on entry form check box, you must log out and log back in to see resident lists on the application’s Update view.
Top
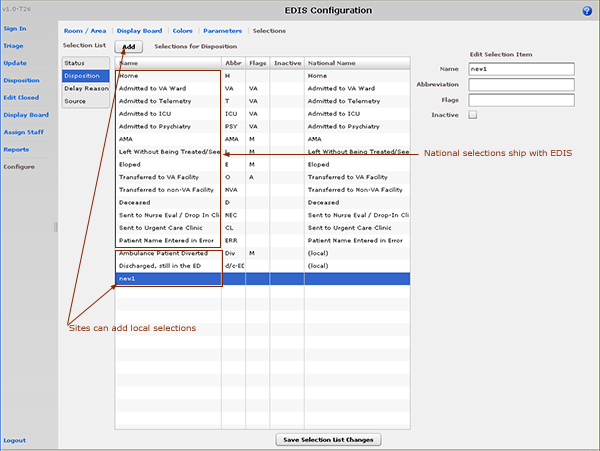
The Configure view—Selections subview.
The Selections subview enables you to add locally meaningful choices to selection lists that ship with EDIS. Specifically, you can add selections to the following lists:
- Status—the application ships with the following statuses:
- Admitted
- Awaiting Triage
- Discharged
- ED Boarding [Hold]
- ED Observation Unit
- ED Patient
- En Route/Prearrival
- Disposition—the application ships with the following dispositions:
- Admitted to VA Ward
- Admitted to Telemetry
- Admitted to ICU
- Admitted to Psychiatry
- Home
- AMA (left against medical advice)
- Left Without Being Treated/Seen
- Eloped
- Transferred to VA Facility
- Transferred to non-VA Facility
- Deceased
- Sent to Nurse Eval / Drop In Clinic
- Patient Name Entered in Error
- Delay Reason—the application ships with the following reasons for delay:
- Obtain Inpatient Bed
- ED to Hospital Bed
- Obtain Imaging Results
- Obtain Imaging Studies
- Obtain Drugs/Pharmacology
- Obtain Lab Results
- Obtain Lab Studies
- Obtain Medical Supplies
- Arrange Emergency Surgery
- Obtain Consult
- On-call Staff
- Patient Transport Home
- Overcrowding of ED
- Patient Transport Other
- Obtain Accepting Physician
- Obtain Escort
- Admitting Physician Evaluation
- Admit Physician Writing Dispo
- Patient Admitted to Observation
- ED Staff Limits
- ED Physician Limits
- Interfacility Transfer
- Obtain Ambulance Services
- Source—the application ships with the following sources:
- Non-referred
- On-site Clinic
- On-site Nursing Home
- VA Clinic, Off-site
- VA Nursing Home, Off-site
- Non-VA Clinic/Office
- Non-VA Nursing Home
- Transfer, Other
The EDIS technical working group (TWG) and technical advisory group (TAG) have vetted these default lists. When sites add selections, the application denotes local adaptations of national status-, disposition-, reason-for-delay-, and source-list values by displaying the word local in the subviews National Name column. National definitions are available for:
Delay reasons
Dispositions
Sources
Statuses
Add Status, Disposition, Delay Reason, and Source Selections
- Select Status, Disposition, Delay Reason, or Source in the Selection List. The application displays the Selections for Status, Selections for Disposition, Selections for Delay Reason, or Selections for Source grid, respectively. Keyboard: use the TAB key to locate the Selection List. Use the DOWN ARROW or UP ARROW key to select Status, Disposition, Delay Reason, or Source.
- Click Add. The application displays the Edit Selection Item pane. Keyboard: use the TAB key to locate the Add button and use the SPACEBAR key to select the button.
- In the Name box (Edit Selection Item pane), type a name for the selection you want to add. Keyboard: use the TAB key to locate the Name box.
- In the Abbreviation box, type an abbreviation for the item you want to add. EDIS uses this abbreviation for its electronic whiteboard display. Keyboard: use the TAB key to locate the Abbreviation box.
-
Status selection additions: if applicable, type the letter A (for admitted) or the letter O (for observation), or both in the Flags box. EDIS uses these flags for reporting and to determine whether or not it should require a reason for delay when emergency-department stays exceed site-specified time limits. Keyboard: use the TAB key to locate the Flags box.
- Disposition selection additions: if applicable, type VA (for VA admission), A (for admitted), or M (for missed opportunity) in the Flags box. EDIS uses these flags for reporting. Keyboard: use the TAB key to locate the Flags box.
- (Optional) If you want to inactivate the new item, select the Inactive check box. The application does not include inactive items on its selection lists. Keyboard: use the TAB key to locate the Inactive check box and use the SPACEBAR key to select it
- (Optional) Change the order in which EDIS displays list selections in its data views by using a drag-and-drop operation to reorder selections in the Selections for Status, Selections for Disposition, Selections for Delay Reason, or Selections for Source lists. Keyboard instructions are not available for this step.
- Click Save Selection List Changes to save your additions (or edits). EDIS displays an Alert message to tell you it successfully saved your changes. Click Close to dismiss this message. Keyboard: use the TAB key to locate the Save Selection List Changes button and use the SPACEBAR key to select the button. Use the TAB key to locate the Close button and use the SPACEBAR key to select it.
Top
Related Topics
General Information
Index
Table of Contents