Triage View
You use the Triage view to edit or update information that you gather as part of the triage process. From this view, you can update patients’ display-board complaints; include additional, not-for-display information about their complaints (optional); update their room or area assignments; add information about their acuities; make nursing, provider, and resident assignments; update or add patients’ sources (offsite clinics, for example); and specify clinic locations for patients’ emergency-department visits. You can also add patients to the display board from the Triage view.
The Triage view.
| Note: | EDIS supports the Emergency Severity Index (ESI) triage algorithm, which ranks patients’ acuities using the numbers 1 (most urgent) through 5 (least urgent). Please visit the Agency for Healthcare Research and Quality ESI Web site for more information. |
| Note: | When you make a nurse, resident, or provider assignment in EDIS, the application automatically creates a Patient Care Encounter (PCE) visit in CPRS—if it hasn't already done so, or unless the nurse or provider does not have an active person class in VistA. EDIS does not create visits for patients youve added using the Enter Name, Patient Is Not in VistA or Ambulance Is Arriving, Patient Name Is Unknown selections. |
The EDIS technical working group (TWG) has provided the following definitions for nationally released status selections:
Admitted—the patient is admitted, but is still in the emergency department.
ED Boarding [Hold]—the patient is admitted and is designated as a holder (implying extended time in the emergency department).
Discharged—the patient is discharged, but is still in the emergency department.
ED Observation Unit—the patient is an observation patient under the emergency department’s care.
ED Patient—the patient is an emergency department patient (after triage).
En Route/Prearrival—the patient is en route to the emergency department.
Awaiting Triage—the patient is at the emergency department and is awaiting triage.
Other Status-list selections are site configurable.
Adding a provider (or a nurse who has an active person class in the New Person file) in EDIS automatically creates a visit in CPRS—unless EDIS has already created a visit for a particular emergency-department episode of care or the staff member you assigned does not have a valid person class in VistA. To reduce the possibility of creating duplicate visits, EDIS checks back one hour for Patient Care Encounter (PCE) visit entries associated with the emergency department location (or locations) specified in the VistA EDPF LOCATION parameter. (EDPF LOCATION parameter settings and—if applicable—Clinic list selections determine the location EDIS uses to create visits.)
EDIS creates only one visit for each emergency-department episode of care (or encounter). You can avoid creating duplicate visits for the same episode of care by selecting the visit that EDIS creates when you complete patients emergency-department encounters in CPRS.
Adding a nurse, resident, or provider assignment in EDIS creates a Patient Care Encounter visit in CPRS.
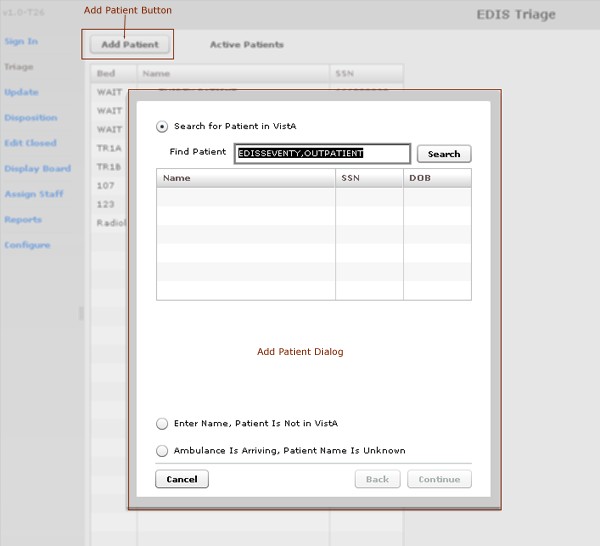
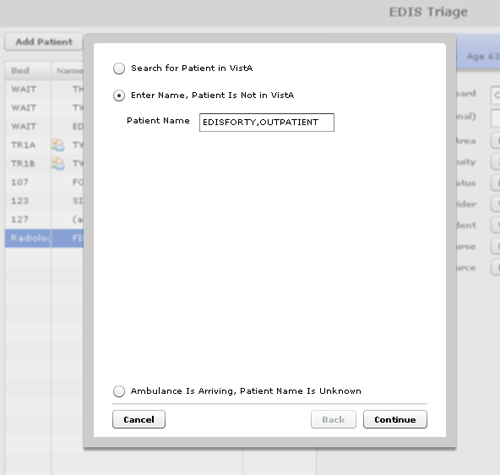
The Add Patient dialog box.
Click Add Patient in the upper right-hand corner of the Active Patients list. Keyboard: use the TAB key to locate the Add Patient button and use the SPACEBAR key to select the button.
| Note: | EDIS does not activate the Add Patient button when you are already in the process of signing in or triaging a patient or updating a patient’s triage information. To activate the Add Patient button in any of these cases, you must select Save to complete the sign-in or triage process, or Cancel to cancel the process and discard the information you’ve entered. Keyboard: use the TAB key to locate the Cancel or Save button. Press the SPACEBAR key to select the button. |
The application displays the Add Patient dialog box, which offers the following three selections:
Search for Patient in VistA
- If necessary, select Search for Patient in VistA. (Search for Patient in VistA is the application’s default selection; in most cases, you wont need to manually select this button.) Keyboard: if the Search for Patient in VistA button isn’t selected, use the TAB key to locate the selected button (Enter Name, Patient Is Not in VistA or Ambulance Is Arriving, Patient Name Is Unknown). Use the UP ARROW key to locate the Search for Patient in VistA button and use the SPACEBAR key to select it.
- Type all or part of the patients name in the Find Patient box using this format: Surname,Firstname. For example, you can search using the patients surname only, or the patients surname and the first initial of his or her first name. You can also search using the initial letter of the patients surname concatenated with the last four digits of his or her Social Security number (X9999 format), the patients entire Social Security number (SSN), or the last four digits of his or her SSN. Keyboard: use the TAB key to locate the Find Patient box.
- Click Search or press the ENTER key.
- The Add Patient dialog box lists possible matches. Select the correct patient and press the ENTER key or click Continue. Keyboard: use the DOWN ARROW and UP ARROW keys to locate the correct patient. Press the ENTER key to select the patient. You can also select the patient by using the TAB key to locate the Continue button and then pressing the SPACEBAR key to select the button.
The application displays the Patient Information pane.
Enter Name, Patient Is Not in VistA
If the Find Patient search list does not contain a match, add the patient using the Enter Name, Patient Is Not in VistA selection.
- Select Enter Name, Patient Is Not in VistA. Keyboard: use the TAB key to locate the Search for Patient in VistA (or currently selected) button. Use the DOWN ARROW (or UP ARROW) key to locate the Enter Name, Patient Is Not in VistA button. Use the SPACEBAR key to select this button.
- Type the patient’s name in the Patient Name box. Keyboard: use the TAB key to locate the Patient Name box.
- Click Continue or press the ENTER key. The application displays the Patient Information pane.
The Enter Name, Patient Is Not In VistA button.Adding Unidentified Patients
When you must add unresponsive patients whose identities you do not know, use the Enter Name, Patient Is Not in VistA selection and follow the naming protocol defined in section 12 of VHA Directive 2006-036: Data Quality Requirements for Identity Management and Master Patient Index Functions. (Use the name UU-UNRESPONSIVE,PATIENT for the first such patient, UU-UNRESPONSIVE,PATIENT A for the second, UU-UNRESPONSIVE,PATIENT B for the third, and so forth.) You can find the full text of this directive at http://www1.va.gov/vhapublications/ViewPublication.asp?pub_ID=1434.
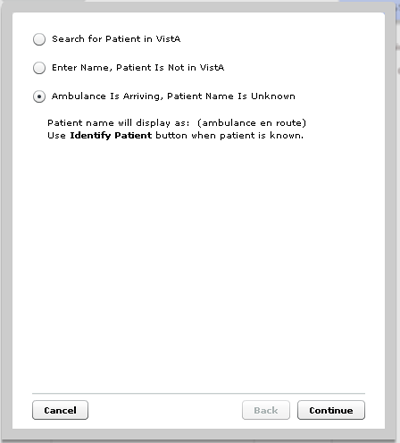
Ambulance Is Arriving, Patient Name Is Unknown
EDIS enables you to prepare for unknown patients who are arriving by ambulance or other types of emergency transportation. You can make room, provider, resident, and nurse assignments before these patients arrive.
- Select Ambulance Is Arriving, Patient Name Is Unknown. Keyboard: use the TAB key to locate the currently selected button (Search for Patient in VistA or Enter Name, Patient Is Not in VistA). Use the DOWN ARROW key to locate the Ambulance Is Arriving, Patient Name Is Unknown button.
- Click Continue. The application displays the Patient Information pane.
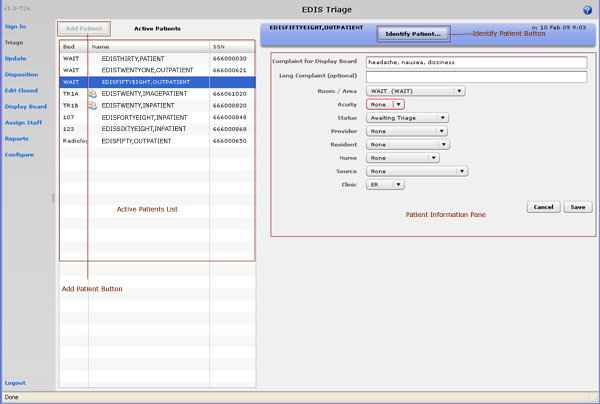
The Add Patient dialog box with the Ambulance Is Arriving, Patient Name Is Unknown button selected.The Identify Patient button, which is located on the Patient Information bar, allows you to identify patients who are in VistA after you’ve added them as patients whose identities are unknown.